[My]3DsizeMe backup procedures
1. Backup
using the file manager on your device
1. Go in 3DsizeMe settings, scroll down to the bottom of the menu and click on Export.
2.
Click on the file manager icon
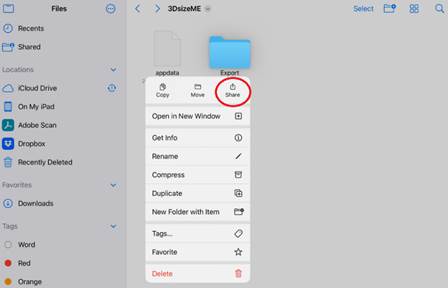
3. Click on My device then on 3DsizeMe, click and hold the “Export” file then on Share. You can then use the method of your choice to get this file out of the device. If the file is too big for email, you may want to use a file hosting website, like Google Drive, One Drive, or the AirDrop function.
 1.1.
Restoring your device data
1.1.
Restoring your device data
1. From the NEW DEVICE, go to your hosting website and find the Export file you have generated.
2. Copy and paste the file in the 3DsizeMe folder (My device).
3. Go in the 3DsizeMe settings and click on Import. It will only appear if the files have been properly put on the device.
4. Restart 3DsizeMe. You should see all your data restored.
2. Backup
using iTunes
This procedure will allow you to export your 3DsizeMe files from your device to your PC computer. If, for any reason, you lose your device or it is unusable, you will be able to restore your last unsubmitted files to a new a device. Please note that the device is not intended to be the place to archive your patient’s files. Preferably, you should submit your scans as soon as possible to your PC and save them there.
1. Click on the Export button in 3DsizeMe settings.
2. Make sure iTunes is installed on your PC. Then, plug the device on your PC.
3.
You should then see your device’s name
in the left column. Click on the device logo at the top:
4. Click on File sharing in the left column, then on 3DsizeMe in the middle column. After a few seconds, you should see an “Export.zip” file appear on the right:
5. Copy the export.zip file out of the iTunes window, in the folder of your choice, on the desktop for example. (For the newest version of iTunes, there is a button at the bottom of the screen for saving).
2.1.
Restoring your device data
1. Plug the device to the computer where you saved your 3DsizeMe data with iTunes.
2. Open iTunes.
3. Click and highlight 3DsizeMe.
4. Put back the zip file under the 3DsizeMe documents heading in the right column.
5. Go to your device, in 3DsizeMe, in the settings, scroll down and click on Import. It will only appear if the files have been properly put on the device.
6. Close the settings box and 3DsizeMe.
7. Restart 3DsizeMe. You should see all your data restored.
Important: Please note that this backup feature is not an archiving system. If you get over 4 GB of data in 3DSizeMe, you won’t be able to make a backup as explained above. The best way to back up your scans is to submit them to your PC and make an extra copy from this source.
Still need help?
Related Articles
Data transfer between applications on an iOS device
This procedure explains how to transfer the application data from the generic 3DSizeME app to a Custom app on the same iOS device. Getting started The 3dsizeme application with the data to import (do NOT delete 3dsizeme before finishing importation - ...